
A pre-settlement inspection checklist is a tool used to ensure a property’s condition aligns with the agreed terms before transfer․ It helps identify issues, ensuring a smooth transaction․
Importance of a Pre-Settlement Inspection
A pre-settlement inspection is crucial for ensuring the property is in the agreed-upon condition before finalizing the purchase․ It allows buyers to identify any new damages or issues that may have arisen since the contract was signed․ This step ensures that all agreed repairs or inclusions, such as fixtures and appliances, are completed as specified․ Conducting this inspection helps prevent future disputes and provides peace of mind․ It also verifies that the property remains in the same state as when the contract was signed, protecting both parties’ interests and ensuring a smooth transaction․ Regular inspections can save time and money by addressing problems early․
Purpose of the Checklist
The pre-settlement inspection checklist serves as a comprehensive guide to thoroughly examine a property before final settlement․ Its primary purpose is to ensure that all agreed-upon repairs, improvements, and inclusions are completed as specified in the contract․ The checklist helps buyers verify that the property remains in the same condition as when the purchase agreement was signed․ It covers key areas such as structural integrity, appliances, plumbing, and landscaping․ By using the checklist, buyers can identify any new issues or damages that may have occurred, ensuring transparency and accountability․ This tool is essential for a smooth and stress-free transaction, as it provides a clear record of the property’s condition at the time of handover․
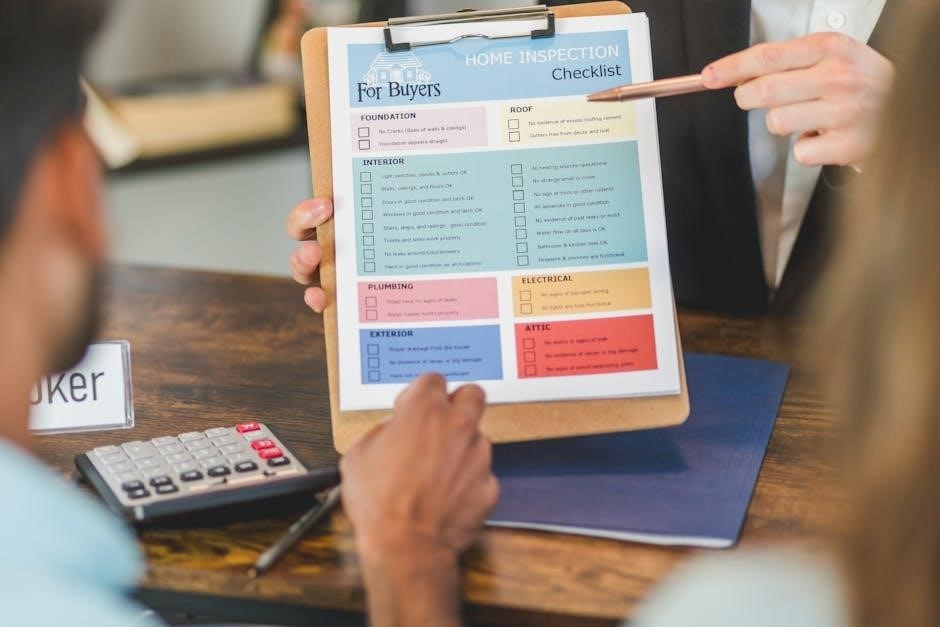
Pre-Settlement Inspection Checklist Details
The pre-settlement inspection checklist examines structural integrity, appliances, plumbing, landscaping, and interior condition, ensuring all aspects are thoroughly reviewed and documented for a smooth transaction․
Structural Integrity Check
The structural integrity check is a critical part of the pre-settlement inspection․ It ensures the property’s foundation, walls, floors, and ceilings are stable and free from significant damage․ Check for cracks in walls, uneven flooring, or signs of water damage․ Verify that doors and windows open and close properly, indicating proper alignment․ Look for any signs of settling or structural shifts that could compromise the property’s safety․ Documenting these details helps ensure all issues are addressed before finalizing the sale, providing peace of mind for the buyer․ This step is essential for verifying the property’s condition matches the agreed terms․
Appliances and Fixtures Inspection
The pre-settlement inspection includes a thorough review of all appliances and fixtures to ensure they are in proper working condition․ Test all major appliances, such as the oven, stove, dishwasher, and refrigerator, to confirm functionality․ Check lighting fixtures, ceiling fans, and plumbing fixtures like taps and toilets for leaks or damage․ Verify that all included items, such as blinds or curtains, are present and undamaged․ Ensure that hot water systems and HVAC are operational․ Document any issues or malfunctions to address them before settlement․ This step ensures that the property is handed over in the agreed condition, with all fixtures and appliances fully functional․

Plumbing and Utilities Review

The plumbing and utilities review ensures all systems are functioning correctly before settlement․ Check taps, toilets, showers, and drains for leaks or blockages․ Test water pressure and confirm hot water systems are operational․ Inspect gas and electrical connections for safety and functionality․ Verify that all utilities, including electricity and gas, are in proper working order․ Check for any signs of water damage or mold, which could indicate hidden issues․ Ensure that all utility meters are correctly registered and functioning․ Document any defects or malfunctions to address them before finalizing the property transfer․ This step ensures the property’s essential systems are reliable and ready for occupancy․
Landscaping and Exterior Condition
The landscaping and exterior condition review ensures the property’s outdoor spaces are in the agreed-upon state․ Inspect lawns, gardens, and trees for health and condition․ Check fences, retaining walls, and outdoor structures for damage or erosion․ Verify that all landscaping features agreed upon in the contract are present and well-maintained․ Look for any signs of pests or overgrown vegetation․ Ensure paths, driveways, and sidewalks are free from cracks or damage․ Check gates for proper functionality and ensure all exterior lights are working․ Document any issues with drainage or water pooling, which could indicate underlying problems․ This step ensures the property’s exterior is visually appealing and structurally sound․
Interior Condition Assessment
The interior condition assessment involves evaluating the property’s internal spaces to ensure they match the agreed-upon state․ Check walls for cracks, peeling paint, or water damage․ Inspect ceilings for stains, sagging, or signs of leaks․ Verify that all windows and doors open and close smoothly, with no damage to frames or glass․ Test all light switches and electrical outlets to ensure functionality․ Examine flooring for scratches, dents, or unevenness․ Ensure carpets are clean and free of stains․ Check cabinets, drawers, and built-in shelves for damage or wear․ Look for signs of pests or rodent infestation․ Confirm that all included fixtures, such as blinds or curtains, are present and in good condition․ Document any issues for further action․
Documentation and Reporting
Proper documentation and reporting are crucial during a pre-settlement inspection․ Start by thoroughly completing the PDF checklist, noting any issues or damages․ Take clear photos of problem areas for visual evidence․ Document all findings, including details about appliances, fixtures, and structural elements․ Organize the report clearly, ensuring it is easy to understand․ Include notes on any agreed repairs that may still be pending or incomplete․ Finally, share the report with relevant parties, such as your legal representative or real estate agent, to address concerns before settlement․ Accurate documentation ensures transparency and helps resolve disputes efficiently․

Preparing for the Pre-Settlement Inspection
Scheduling the inspection at the right time and bringing the checklist ensures a thorough review․ Confirm all agreed repairs are completed before proceeding․
When to Conduct the Inspection
The pre-settlement inspection should be conducted shortly before the settlement date, ideally within a week․ This ensures any last-minute issues can be addressed․ It’s crucial to schedule the inspection during daylight for a thorough review․ Bring the checklist to systematically evaluate the property’s condition, comparing it to when the contract was signed․ Check for any new damages, confirm all agreed repairs are completed, and ensure included fixtures and appliances are present and functional․ This step ensures transparency and peace of mind, helping to avoid post-settlement disputes․ Proper timing and preparation are key to a smooth transaction․
What to Bring Along
When conducting a pre-settlement inspection, it’s essential to bring along a few key items to ensure a thorough review․ First, bring a pre-settlement inspection checklist to guide your evaluation and ensure nothing is overlooked․ A camera or smartphone is useful for documenting any issues or damages․ Measuring tape and a flashlight can help inspect hard-to-reach areas or verify measurements․ Carry a set of keys to access all parts of the property․ Additionally, bring identification and any relevant documents, such as the sale contract or previous inspection reports․ Lastly, a pen or stylus is handy for marking off items on your checklist or noting concerns․ This preparation ensures a smooth and effective inspection process․
Time Required for Inspection
The time required for a pre-settlement inspection typically ranges between 30 to 60 minutes, depending on the property’s size and condition․ Larger properties or those with more complex features may require up to 90 minutes․ It’s important to allocate sufficient time to thoroughly review all areas, ensuring no potential issues are overlooked․ The inspection should be conducted carefully, as it is a critical step in confirming the property’s condition aligns with the agreed terms․ Rushing through the process may lead to missed details, which could later result in costly or time-consuming resolutions․ Plan accordingly to ensure a comprehensive evaluation․

Conducting the Inspection

The inspection involves a systematic review of the property to ensure it meets agreed conditions․ Check each area carefully to identify any issues that need addressing;
Step-by-Step Inspection Process
The inspection begins with a thorough walk-through of the property, starting from the exterior․ Check for any damage or changes since the contract was signed․ Exterior areas include walls, roofs, and gardens․ Next, inspect interior spaces, focusing on walls, floors, and ceilings for cracks or damage․ Test all appliances to ensure they are functional․ Review plumbing by checking taps and drains for leaks․ Inspect fixtures, such as lighting and door handles, for proper operation․ Document any issues and compare them with the agreed terms․ Finally, ensure all repairs have been completed as per the contract․ This methodical approach ensures no detail is overlooked․
Identifying and Documenting Issues
During the pre-settlement inspection, it’s crucial to systematically identify and document any issues․ Start by using the checklist to note damages, defects, or changes since the contract was signed․ Pay attention to structural elements, appliances, and fixtures․ Test lights, taps, and plumbing to ensure functionality․ Photograph any damage or concerns for clarity․ Compare findings with the agreed terms in the contract․ If issues arise, document them thoroughly and discuss with the seller or agent․ This step ensures transparency and accountability, helping to resolve problems before settlement; Accurate documentation is key to a smooth transaction;
Ensuring All Agreed Repairs are Completed

The final pre-settlement inspection is your opportunity to verify that all agreed repairs and improvements have been completed․ Use your checklist to cross-reference any issues previously noted․ Ensure that all fixtures, appliances, and structural elements are in good condition․ Test functional items like taps, lights, and appliances to confirm they work properly․ If repairs were agreed upon, verify they’ve been completed to your satisfaction․ Document any unfinished work and discuss it with the seller or agent․ This step ensures that the property meets the agreed-upon standards before settlement, protecting your investment and avoiding post-settlement disputes․ Clear documentation is essential for a fair resolution․
Downloading and Using the Checklist
You can easily download a pre-settlement inspection checklist PDF for free online․ Customize it to suit your needs, adding or removing sections as required․ Use it during your inspection to ensure all areas are thoroughly checked and documented․ This tool helps streamline the process and ensures no details are overlooked․
How to Obtain the PDF Checklist
To obtain a pre-settlement inspection checklist PDF, you can download it from various online sources, such as legal or real estate websites․ Many platforms offer free templates that you can customize to fit your specific needs․ Simply search for “pre-settlement inspection checklist PDF” and choose a reliable source․ Once downloaded, you can print it or fill it out digitally․ Some websites also provide editable versions, allowing you to add or remove sections as needed․ Ensure the checklist covers key areas like structural integrity, appliances, and plumbing․ This tool is essential for ensuring a thorough and organized inspection process․
Customizing the Checklist for Your Needs
Customizing a pre-settlement inspection checklist PDF allows you to tailor it to your property’s specific requirements․ Start by reviewing the template and adding or removing sections based on your needs․ For example, if the property includes a pool or garden, ensure those areas are included․ You can also add notes or photos for clarity․ Use editing tools like Adobe Acrobat or online PDF editors to make changes․ This ensures the checklist is comprehensive and relevant, helping you identify potential issues during the inspection․ By personalizing the checklist, you can streamline the process and ensure all critical areas are evaluated․
A pre-settlement inspection checklist ensures the property meets agreed conditions, identifies issues, and facilitates a smooth transaction, providing peace of mind for buyers․
Final Thoughts on the Importance of Inspection
A pre-settlement inspection checklist is crucial for ensuring a property’s condition aligns with the agreed terms, protecting both buyers and sellers․ It provides clarity and accountability, reducing post-settlement disputes․ By systematically evaluating structural integrity, appliances, and utilities, buyers can confirm that all agreed repairs are completed․ This process not only ensures peace of mind but also safeguards against potential financial losses․ Regular use of a detailed checklist fosters transparency and trust, making it an indispensable tool in real estate transactions․ Ultimately, a thorough inspection is a wise investment in securing a smooth and satisfactory property transfer․